PyBDSF Basics
PyBDSF has been designed to share many similarities with the CASA interactive environment (known as casa [1] ), which is in turn based on AIPS. Therefore, the commands used in PyBDSF should be familiar to anyone who has used these software packages.
Starting PyBDSF
After installing (see Downloading and installing) you can start the interactive PyBDSF shell by simply opening a terminal and typing:
$ pybdsf
at the terminal prompt.
Note
If the above command does not work, please make sure you have installed the interactive shell (it is not installed by default). See Downloading and installing for details.
The interactive environment will then load, and a welcome screen listing common commands and tasks will be shown. You will then be at the PyBDSF prompt, which looks like this:
BDSF [1]:
Quitting PyBDSF
To quit PyBDSF, type quit or enter CNTL-D at the prompt.
Getting help
PyBDSF has an extensive built-in help system. To get help on a command or task, type:
help <command or task name>
For example, to get help on the process_image task, type:
help process_image
To get help on a input parameter to a task, type:
help '<parameter name>'
Note the quotes, which are necessary (since parameter names are strings). For example, to get help on the 'rms_box' paramter, type:
help 'rms_box'
Simply typing help will start the Python help system.
Logging
Logging of all task output is done automatically to a log file. Logs for subsequent runs on the same image are appended to the end of the log file. The log for each run includes a listing of all the non-default and internally derived parameters, so that a run can be easily reproduced using only information in the log.
Commands
As in CASA, PyBDSF uses a number of commands to list input parameters for tasks, to execute the tasks, etc. The PyBDSF commands are as follows:
inp task ............ : Set current task and list parameters
go .................. : Run the current task
default ............. : Set current task parameters to default values
tput ................ : Save parameter values
tget ................ : Load parameter values
- inp
This command sets the current task (e.g.,
inp process_image) and lists the relevant parameters for that task. If entered without a task name, the parameters of the previously set task will be listed.Note
At startup, the current task is set to the
process_imagetask.- go
This command executes the current task.
- default
This command resets all parameters for a task to their default values.
If a task name is given (e.g.,``default show_fit``), the parameters for that task are reset. If no task name is given, the parameters of the current task are reset.
- tput
This command saves the processing parameters to a file.
Note
After the successful completion of a task, the current parameters are saved to the file ‘pybdsf.last’.
A file name may be given (e.g.,
tput 'savefile.sav'), in which case the parameters are saved to the file specified. If no file name is given, the parameters are saved to the file ‘pybdsf.last’. The saved parameters can be loaded using the tget command.- tget
This command loads the processing parameters from a parameter save file.
A file name may be given (e.g.,
tget 'savefile.sav'), in which case the parameters are loaded from the file specified. If no file name is given, the parameters are loaded from the file ‘pybdsf.last’ if it exists.Normally, the save file is created by the tput command.
Tasks
The following tasks are available in PyBDSF:
process_image ....... : Process an image: find sources, etc.
show_fit ............ : Show the results of a fit
write_catalog ....... : Write out list of sources to a file
export_image ........ : Write residual/model/rms/mean image to a file
- process_image
This task processes an image to find and measure sources. See process_image: processing an image for details.
- show_fit
This task shows the result of a fit. See show_fit: visualizing the fit results for details.
- write_catalog
This task writes the source catalog. See write_catalog: writing source catalogs for details.
- export_image
This task exports an internally derived image. See export_image: exporting internally derived images for details.
Hierarchy of an astronomical image
The following figure shows the basic hierarchy of an image adopted by PyBDSF. Islands of emission are identified and decomposed into Gaussians. The Gaussians are then grouped into sources.
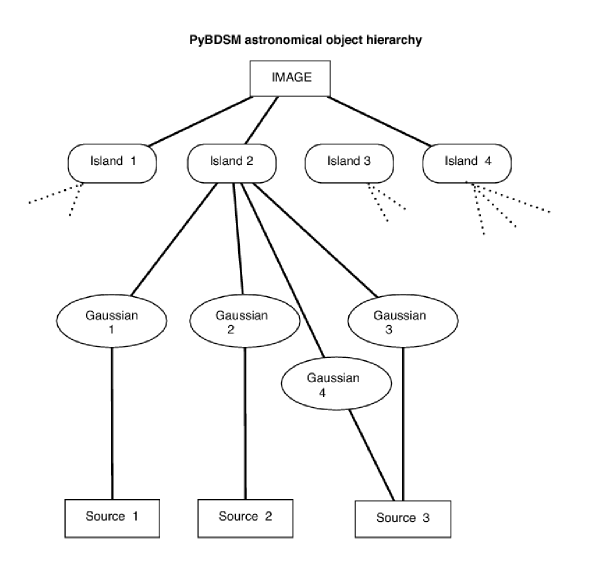
The hierarchy of an image.
Quick-start example
Below is an example of using PyBDSF to find and measure sources in an image:
$ pybdsf
PyBDSF version 1.1
========================================================================
PyBDSF commands
  inp task ............ : Set current task and list parameters
  par = val ........... : Set a parameter (par = '' sets it to default)
                          Autocomplete (with TAB) works for par and val
  go .................. : Run the current task
  default ............. : Set current task parameters to default values
  tput ................ : Save parameter values
  tget ................ : Load parameter values
PyBDSF tasks
  process_image ....... : Process an image: find sources, etc.
  show_fit ............ : Show the results of a fit
  write_catalog ....... : Write out list of sources to a file
  export_image ........ : Write residual/model/rms/mean image to a file
PyBDSF help
  help command/task ... : Get help on a command or task
                          (e.g., help process_image)
  help 'par' .......... : Get help on a parameter (e.g., help 'rms_box')
  help changelog ...... : See list of recent changes
________________________________________________________________________

BDSF [1]: inp process_image
--------> inp(process_image)
PROCESS_IMAGE: Find and measure sources in an image.
=================================================================================
filename ................. '': Input image file name
advanced_opts ........ False : Show advanced options
adaptive_rms_box ..... False : Use adaptive rms_box when determining rms and
                               mean maps
atrous_do ............ False : Decompose Gaussian residual image into multiple
                               scales
beam .................. None : FWHM of restoring beam. Specify as (maj, min, pos
                               ang E of N) in degrees. E.g., beam = (0.06, 0.02,
                               13.3). None => get from header
flagging_opts ........ False : Show options for Gaussian flagging
frequency ............. None : Frequency in Hz of input image. E.g., frequency =
                               74e6. None => get from header.
interactive .......... False : Use interactive mode
mean_map .......... 'default': Background mean map: 'default' => calc whether to
                               use or not, 'zero' => 0, 'const' => clipped mean,
                               'map' => use 2-D map
multichan_opts ....... False : Show options for multi-channel images
output_opts .......... False : Show output options
polarisation_do ...... False : Find polarisation properties
psf_vary_do .......... False : Calculate PSF variation across image
rms_box ............... None : Box size, step size for rms/mean map calculation.
                               Specify as (box, step) in pixels. E.g., rms_box =
                               (40, 10) => box of 40x40 pixels, step of 10
                               pixels. None => calculate inside program
rms_map ............... None : Background rms map: True => use 2-D rms map; False
                               => use constant rms; None => calculate inside
                               program
shapelet_do .......... False : Decompose islands into shapelets
spectralindex_do ..... False : Calculate spectral indices (for multi-channel
                               image)
thresh ................ None : Type of thresholding: None => calculate inside
                               program, 'fdr' => use false detection rate
                               algorithm, 'hard' => use sigma clipping
thresh_isl ............. 3.0 : Threshold for the island boundary in number of
                               sigma above the mean. Determines extent of island
                               used for fitting
thresh_pix ............. 5.0 : Source detection threshold: threshold for the
                               island peak in number of sigma above the mean. If
                               false detection rate thresholding is used, this
                               value is ignored and thresh_pix is calculated
                               inside the program

BDSF [2]: filename = 'sb48.fits'
BDSF [3]: go
--------> go()
--> Opened 'sb48.fits'
Image size .............................. : (256, 256) pixels
Number of channels ...................... : 1
Beam shape (major, minor, pos angle) .... : (0.002916, 0.002654, -173.36) degrees
Frequency of averaged image ............. : 146.497 MHz
Blank pixels in the image ............... : 0 (0.0%)
Flux from sum of (non-blank) pixels ..... : 29.565 Jy
Derived rms_box (box size, step size) ... : (61, 20) pixels
--> Variation in rms image significant
--> Using 2D map for background rms
--> Variation in mean image significant
--> Using 2D map for background mean
Min/max values of background rms map .... : (0.05358, 0.25376) Jy/beam
Min/max values of background mean map ... : (-0.03656, 0.06190) Jy/beam
--> Expected 5-sigma-clipped false detection rate < fdr_ratio
--> Using sigma-clipping thresholding
Number of islands found ................. : 4
Fitting islands with Gaussians .......... : [====] 4/4
Total number of Gaussians fit to image .. : 12
Total flux in model ..................... : 27.336 Jy
Number of sources formed from Gaussians   : 6

BDSF [4]: show_fit
--------> show_fit()
The figure made by show_fit is shown in the figure below. In the plot window, one can zoom in, save the plot to a file, etc. The list of best-fit Gaussians found by PyBDSF may be written to a file for use in other programs as follows:
BDSF [5]: write_catalog
--------> write_catalog()
--> Wrote FITS file 'sb48.pybdsf.srl.fits'
The output Gaussian or source list contains source positions, fluxes, etc.
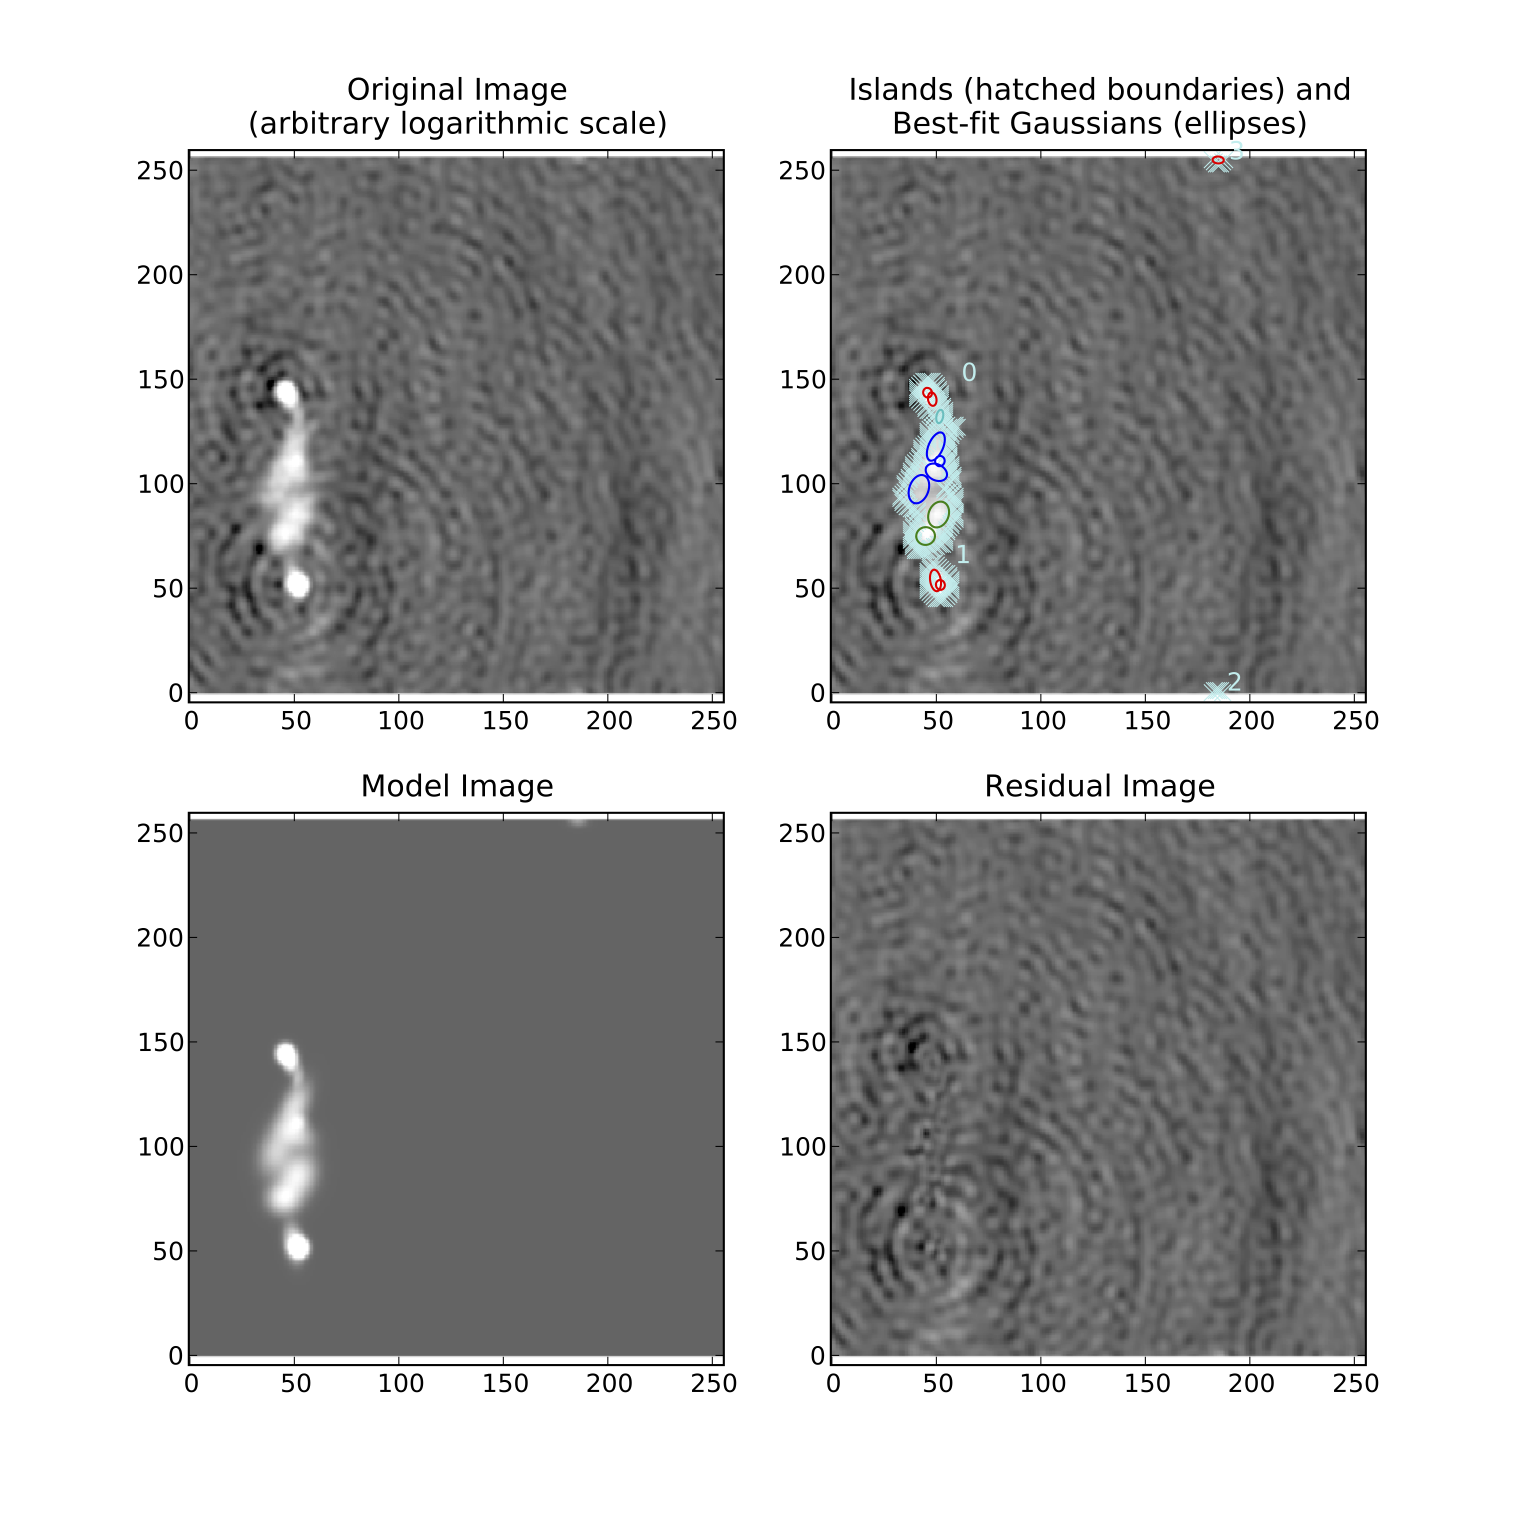
Output of show_fit, showing the original image with and without sources, the model image, and the residual (original minus model) image. Boundaries of the islands of emission found by PyBDSF are shown in light blue. The fitted Gaussians are shown for each island as ellipses (the sizes of which correspond to the FWHMs of the Gaussians). Gaussians that have been grouped together into a source are shown with the same color. For example, the two red Gaussians of island #1 have been grouped together into one source, and the nine Gaussians of island #0 have been grouped into 4 separate sources.
Footnotes